|
Kart Body Questions
Lubrication
Adjustments
Tires & Wheels
General Problems
Lubrication
Interval - Lubricate your kart at
least monthly, or after every wash (or riding in wet areas).
Body -
Common-sense lubrication is essential to the operation of your kart.
Lubricate spindle bolts, seat sliders, pivot points on pedals, and most
moving parts. Use a good spray grease (such as a chain lube), or 30w
motor oil if chain lube is unavailable. Avoid products designed to
break loose bolts and nuts.
Chain -
Lubricate your chain every day you drive your kart, after you drive it.
That will allow the lubricant to soak-in overnight. On
clutch karts, use lubricant designed
especially for clutch karts, or 30w motor oil if chain lube is
unavailable. Do not use anything with Teflon or PTFE in it -- they
can ruin the clutch. On torque converter
karts, use a good spray grease (such as a chain lube), or 30w motor oil if
chain lube is unavailable. Avoid products designed to break loose
bolts and nuts on any chain.
Chain Lube
Video -- Press "Play" (below) to Start
You must be 18 years or older
to view these instructions; minors should never work on go-karts.
You may save
this to your computer for future reference, but you may not otherwise copy
it in any manner, nor use it for any public display.
Click here to purchase a higher-resolution DVD containing this video
and others.
Download Windows Media Player
Adjustments
Chain
- Your chain should be tightened after the first 5 - 10 hours of
use, then about every 20 hours thereafter (not applicable to BDM clutch karts
with the automatic chain adjuster). Your chain should have about
1/2" slack in it. Procedures vary by kart, but most chains are
tightened by loosening the engine bolts (or the jackshaft mounting plate
on torque converter karts), and moving the engine.
DO NOT REMOVE LINKS FROM THE CHAIN.
If the chain is stretched beyond available adjustment, replace the chain.
At this point, the chain links have stretched too much for the sprockets,
and continued use will destroy your sprockets.
SPECIAL NOTE:
We often hear, "Why does my new chain not fit?"
The answer is in the preceding paragraph. The engine was moved to
accommodate chain stretch. The new chain is the original length, and
the engine will have to be moved to its original position for a new
chain.
Brakes
- Disk brakes must be adjusted to compensate for wear. On most disk
calipers, there is a retaining nut that must be loosened, then adjust the
adjusting bolt for correct engagement. Tighten the retaining nut
snugly, then check the brakes prior to starting the engine or riding the
go-kart. Band brakes generally have no adjustment. Band brakes
are not adjustable, and should be replaced when they are (a) damaged, (b)
worn out, or (c) get oil or other lubricants on them.
Shocks
- Shocks/springs need to be adjusted according to the weight of the rider(s).
Adjust shocks so the tire runs straight and evenly across the surface.
To adjust the shock, most have a cogged bracket that may be turned.
A spanner wrench is the desired tool to adjust this, but "channel lock"
("water pump" to those of us with grey hair) pliers will also do the job.
Bolts & Nuts
- Most bolts and nuts should be of the self-locking style, but check them
every time you ride your kart, anyway. A loose bolt can cause a
serious accident.
Tires & Wheels
Wheel Replacement - Wheels with
bearings (typically, "roll" or stub-axle wheels)
-- If you remove your wheel, it's important to install it correctly, or
you'll break your bearings. Spin the wheel while you tighten the
center nut (use hand tools, not air). As soon as it starts to bind -- don't let it lock up --
quit tightening, and loosen it 1/4 turn. Your bearings are now
properly torqued. Too loose, and they'll break. Too tight, and
you'll break the retaining ring. In either case, your wheel could
come off the kart while it's being driven if the wheel is not properly
installed.
Make sure your locking nut is not worn out -- they are generally good for
only 2 or 3 times on/off. The nut must be the locking type -- either
a nylon insert or the "heim" nut that looks crushed.
Bearing Replacement - There are two
types of bearings used in most American-made karts, those with retaining
rings, and those without. The retaining ring bearing may be used in
the place of a bearing without the retaining ring by simply removing the
retaining ring.
Bearings without a retaining ring are used with hubs where there is an
inner ring that holds the bearing in place and keeps it from being sucked
into the hub. Carter Brothers was the most common manufacturer that
used that style. Most use the retainer style, which has a built-in
retainer ring to hold the bearing in place.
To remove a damaged bearing, insert a flat screwdriver into the hub from
the opposite side and place it against the outside edge of the bad
bearing. Tap it gently with a hammer, then move the screwdriver 180°
to the opposite outside edge and repeat. Continue until the bearing
falls out.
To install a new bearing, place the hub on a flat surface. If the
bearing has a retainer ring, place it on the "up" side -- farthest from
the hub. That allows the majority of the bearing to go inside the
hub. Place the bearing evenly, then place a piece of wood on top of
it. Gently tap the wood with a hammer, being careful to drive the
bearing into the hub evenly. Tap lightly until the retaining ring
hits the hub.
Be sure and read the instructions above regarding
putting the wheel back onto the kart, or you'll break the bearing.
Warning: Go-karts require
high speed, sealed bearings. Lawnmower bearings are about half the
cost (or less), but are not designed for the high speed of a kart.
They will fail quickly, and possibly allow the wheel(s) to come off while
riding.
Tire Replacement - If you have a
2-piece rim and need to change the tire, let the air out of the tire
before you do anything else. Disassemble the rim into two halves,
pull the tube out of the old tire and put it in the new tire, then
re-assemble the halves. Be careful not to pinch the tube when you
tighten the wheel halves -- it's easy to do! Putting air back into the
tire will be the last thing you do.
If you have
tubeless (1-piece) wheels, take the wheel assembly to an authorized
service center and let them change it. It's very difficult to change
a tubeless tire without a machine, and it's very easy to destroy the tire
when putting it on the rim by hand. It can easily "break the bead,"
which is NOT a tire defect ... it's caused by improper mounting.
(The inner bead of the tire will appear warped -- like a roller coaster.
This is an absolute example of improper mounting, not a defective tire.)
General Problems
Chain comes off - check the following:
-
Tension --
(see above under Adjustments - Chain)
-
Alignment
-- If the chain is not aligned, it will come off.
-
Integrity
-- Take the chain and hold it up in the air by one end. Does the
chain fall straight toward the ground? Or, does it twist and/or
are their kinks in the chain? If the latter, replace the chain --
it will never stay on for very long.
-
Worn out -- Place the chain across the
rear (large) sprocket and see if you can pull the chain away from the
sprocket. If it moves away more than a VERY small amount, it is
worn out. Continued use will destroy the sprocket and the clutch.
Front tires wear quickly - check the
following:
-
Surface -- If you are driving
on gravel or paved surfaces, your tires -- especially the front ones --
will wear quickly.
-
Pattern -- If one tire is
worn more than the other, it may be caused by your driving pattern.
If you make more turns to one direction than the other (such as driving
on an oval track), your tire wear will be irregular.
-
Alignment -- Take a tape
measure and measure the distance from the center of one tire to the
center of the other tire. Measure this at the leading edge (very
front) of the tires. Now do this on the trailing edge (very back)
of the tires. Compare the two measurements -- they should be
within 1/2" of each other (the closer the better). If alignment is
needed, it is accomplished by adjusting the tie rods.
CAUTION: If you adjust the tie
rods "out," ensure you still have a minimum of 5 threads from the tie
rod screwed into the ball joint -- any less than that, and the tire rod
could pull out of the ball joint, causing steering failure.
NOTE: If you are performing
front-end alignment on a kart with suspension, the alignment needs to be
done with the shocks/springs depressed in the normal riding position.
Load the kart with the normal riding weight prior to checking/correcting
alignment. Failure to do so will give incorrect readings.
-
Bent spindle -- The spindle
is the part that turns the wheels. The wheel is bolted onto the
spindle, and an arm from the spindle is generally attached to the tie
rod via a ball joint. If the spindle is bent, improper alignment
will result, causing excessive tire wear (generally on one side).
Compare the two spindles (left and right) to see if one looks bent.
Also, look for cracked paint -- a sure sign of damage. Lastly,
compare the distance on both sides from the tire to the arm on the
spindle -- if the distance is different, at least one of your spindles
is bent. CAUTION: Do not
attempt to straighten a bent spindle. When a spindle is bent, its
strength is lessened. Bending it again will lessen it more.
(Think about bending a coat hanger several times -- it breaks!)
Using a bent spindle can cause loss of steering control.
-
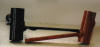
(Examples
of spindles)
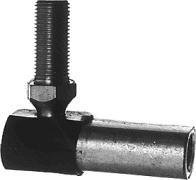
Damaged ball joint - Ball joints are
the connecting pieces between the spindle and the tie rod. They are
distinguished by a "socket" that contains a bolt with a "ball" on the end,
with the ball firmly enclosed by the socket. If the ball has been
pulled out of the socket, do not put it back in. It is damaged, and
it will not hold. This will cause a wreck! Replace the ball
joint.
Return to
Tech
Talk Menu
|